As a vaper, becoming a mixologist is a useful skill that allows you to cut costs whilst keeping you in plenty of supply of your favourite e-liquid.
Surprisingly, mixing your own juice isn’t as complicated as it seems, in fact, it takes only four ingredients to make up a batch.
In our simple guide, we’ll detail everything you need to measure and make your own e-liquid.
How does e-liquid & DIY e-liquid differ?
Firstly, let’s begin with the difference between standard e-liquid and DIY e-liquid. Standard e-liquid comes premixed with ingredients balanced to create a specific PG/VG and nicotine if included. These often follow a recipe to ensure the mixtures are identical.
DIY, however, allows the mixer to balance out individual ingredients to design a flavour that suits their needs.
Premixed e-liquid is simple, but DIY offers more opportunity to experiment with flavours whilst also cutting costs.
The Essentials
To be a DIY mixer - you do need certain tools and ingredients to create a batch of e-liquid successfully.
E-Liquid Ingredients
To make e-liquid, you need three to four ingredients, depending on whether you desire a nicotine juice or not.
The ingredients required:
The base products for e-liquid are PG and VG. The first is the flavour element while the latter is the smoothening agent that reduces the intensity of the throat hit. Both are common ingredients that are used in food and pharmaceuticals, among many other products.
Alongside this, you need a flavour concentrate, which is the pure form of the flavour and should never be directly vaped.
The fourth ingredient is nicotine, and this is entirely optional. Our NicIt Up shots come with a variety of PG/VG ratios.
Mixing Tools
Alongside the ingredients, you do need certain mixing tools, which are dependant on how you intend to measure your e-liquid - see below for more information.
The three essentials:
- Empty E-liquid Bottles
- Disposable Gloves
- Labels (use these to list ingredients and measurements for future mixes)
Further tools will depend on how you measure your ingredients, which can be done via weight or volume.
If you are measuring by weight, you will need a scale. We recommend using a high-quality one that measures from 0.01 to 200g.
However, if you measure via volume, then you will need syringes to mix the required amount. To achieve this, you will need various syringe sizes. For the PG/VG we recommend 10ml-30ml syringes and for nicotine and flavour concentrates we suggest 1ml syringes.
Once you have the tools and ingredients required, you’re ready to measure and mix.
Measure it Out
Measurement is key when it comes to DIY.*
With e-liquid, there are two methods of mixing - either by weight or volume.
Weight is often the preferred method and is usually considered the easiest as users can utilise our mixing calculator to measure each ingredient specifically.
The alternative is by volume, which is the process of using syringes, ideally one per ingredient, to create the e-liquid. Measuring by volume can be messy, and it is not as precise at measuring by weight.
When it comes to measuring e-liquid, we will always recommend measuring by weight as it’s more accurate, especially when creating smaller amounts of e-liquid.
*Please note, that we do recommend a measurement of 15-20% for flavour concentrates except for certain flavours such as Black Jack and Pear, in which we suggest no higher than 12%.
Let’s Get Mixing
This is the easy part.
All you need to do once you have measured all the ingredients is, pour each ingredient into a container whilst continuously stirring. In doing this, you will ensure the ingredients blend together, thus creating the mixture.
Once mixed, pour into the empty e-liquid bottles, secure with the nib and lid and shake once again.
Just Before You Vape
You’ve measured your e-liquid, mixed it and bottled it, but before vaping - you do need to let the mixture steep. This helps the ingredients to mix better, which enhances the overall flavour.
Steep times do vary, for instance with creamy and dessert flavours we recommend you steep these for around a week. Whereas fruit, menthol and tobacco mixtures can be vaped after five to ten minutes.
Once the mixture has steeped, you’ll need to test the juice. It’s best to avoid a tank and instead use a high-quality dripper or RDA. This way you won’t ruin your coils on e-liquid that isn’t good. Do note temperature, wattage and voltage will make the e-liquid taste different. Use easily changeable wicks so that you can test the variables.
Remember to store your e-liquid in a cool, dry, dark place and out of reach of children and pets.
Final points:
- Less is more: don’t make overly huge batches for new flavours as this could be wasteful.
- Take notes so that you can replicate flavours.
- The end result won’t be the exact match to the premixed branded version.
There you have it, the 101 guide to mixing e-liquid. The thought of mixing e-liquid is more daunting than the method itself. Just remember that measurement is key for DIY mixing.
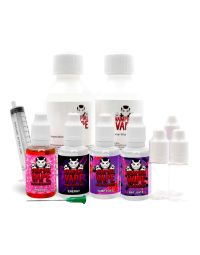
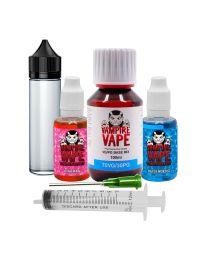
We do have kits available that include all the essentials, for a newcomer we would recommend the Mini Kit, and for those who want a more advanced experience then we recommend the DIY Kit.